Software - Topics about the Software of BEEPTOOLKIT.
Beeptoolkit: Positioning and Application Scope
Introduction
Beeptoolkit is designed as a flexible tool for prototyping, automation, and robotics across various domains. It is important to emphasize that Beeptoolkit is not an industrial PLC controller in the strict sense of IEC 61131-3. This is a deliberate positioning, declared openly so that users and partners clearly understand the platform’s actual capabilities and limitations.
Compliance with Industrial Standards
IEC 61131-3: Beeptoolkit is not officially certified and does not comply with this standard.
PLC Controllers: The platform is not intended for use in environments that require guaranteed fault tolerance, industrial certification, or operation under extreme conditions.
Where Beeptoolkit is Applicable
Despite not being a PLC, Beeptoolkit is effectively used in projects where flexibility, fast deployment, and accessible tools are critical:
FoodTech and small-scale production automation
Warehouse systems and logistics
Vending machines and retail devices
Laboratory setups and research projects
Control of small-scale mechanics and robotic systems
Visual controllers and user interfaces
Platform Advantages
Rapid creation of MVPs and prototypes
Visual programming without deep embedded development knowledge
Built-in image processing and integration with external systems
Support for ready-made USB GPIO and widely available low-cost modules to connect a broad range of binary logic devices (sensors, drivers, converters, etc.), eliminating the need to design custom PCB boards
Ability to scale solutions for small batches and pilot implementations
Limitations
No industrial certification
No guaranteed fault tolerance at PLC level
Limited support for industrial fieldbuses
Standard temperature and mechanical application limits
Conclusion
Beeptoolkit is a toolkit for innovative teams that need to validate hypotheses quickly, build prototypes, and scale to pilot systems. We draw a clear line: where an industrial PLC is required, certified systems are the right choice; where speed, flexibility, and accessibility matter, Beeptoolkit becomes the optimal solution.
What makes BEEPTOOLKIT different from other hardware logic control systems?

Beeptoolkit differs from standard PLCs (Programmable Logic Controllers) and similar DSP (Digital Signal Processing) controllers in the following key aspects:
1. Simplified Development: No Programming Required
- Beeptoolkit: Offers an intuitive visual interface where users create algorithms by entering simple logical instructions (e.g., “AND,” “OR,” “NOT”, “XOR”) instead of writing code. This significantly lowers the entry barrier, enabling even non-programmers to use the platform effectively. As an example – controlling a stepper motor.
- PLCs and DSPs: Typically require knowledge of specialized programming languages such as Ladder Logic, Structured Text (ST), or C/C++, making the development process complex and accessible only to qualified engineers.
2. Flexible and Scalable I/O
- Beeptoolkit: Supports a scalable number of input/output channels (1–1600 inputs and 16–80 outputs), allowing the platform to adapt to tasks of varying complexity across different industries, including agriculture, instrumentation, and aerospace.
- PLCs and DSPs: Are often limited to fixed sets of I/O modules, requiring additional hardware or modules for non-standard configurations.
3. Democratization of Technology
- Beeptoolkit: The platform’s concept is focused on accessibility and democratization of development. It allows a wide range of users, including startups, small businesses, and even individual enthusiasts, to quickly develop and prototype solutions.
- PLCs and DSPs: High equipment costs, the need for specialized training, and complex integration processes often limit their use to large enterprises.
4. Response Time and Processing Speed
- Beeptoolkit: Offers a response time of 70 ms for output signals and an input data reading frequency of 200 ms. This makes the platform effective for real-time applications.
- PLCs and DSPs: While DSP controllers can achieve higher performance for complex signal processing tasks, PLCs often have slower response times and require optimization for real-time operations.
5. Ease of Integration
- Beeptoolkit: Utilizes standard interfaces such as USB, UART, and supports user-friendly configuration methods (e.g., via Type-C). This reduces the complexity of integrating sensors, motors, and other devices.
- PLCs and DSPs: Typically require proprietary communication protocols and additional tools for hardware integration.
6. Versatility and Cross-Industry Applications
- Beeptoolkit: Designed as a universal tool suitable for a wide range of industries (agriculture, healthcare, industrial automation, retail, defense, and more).
- PLCs and DSPs: Are generally tailored to specific tasks (e.g., industrial process control or signal processing) and are less versatile.
7. Cost and Accessibility
- Beeptoolkit: Aims to reduce development costs by offering an affordable tool for small and medium-sized businesses.
- PLCs and DSPs: Are more expensive in terms of equipment, training, and maintenance.
Conclusion
Beeptoolkit provides a unique approach to automation and control by combining simplicity, accessibility, and versatility. Unlike traditional PLCs and DSP controllers, it focuses on reducing costs, shortening development time, and making advanced technologies available to a broader audience, including users without technical experience.
How to install IDE Soft Controller BEEPTOOLKIT
- Install the Software:
Run theSetup.exefile and wait for the installation confirmation message. At the end of the installation process, you will be prompted to install the CH340 driver. Confirm the installation by clicking the “INSTALL” button, wait for the confirmation message, close the success notification, and restart your computer.As of now, all versions starting from revision 260325_1 have been optimized for the installation process. There is no need to manually install the CH341SER driver. When prompted by the installer, simply agree to install it and wait for the installation to complete.
*After successful installation and a computer restart, you can use the software by following all the usage instructions. Additionally, there is no need to activate the WAITING mode, as it is enabled by default.
Activation of S and P Versions:
Launch the Software:
Open the file located at…\Program Files (x86)\Beeptoolkit…\beeptoolkit.exeor use the shortcut in the installed programs menu.Generate and Activate Your Key:
- Double-click the SEND KEY button twice until the ID field with a partial password appears.
- Copy the activation code sent to you via email.
- Paste the activation code into the ID field, appending it to the previously generated partial password.
Save Configuration:
- If the ID field disappears, the activation process was successful. Click the SAVE CONFIG button to save the configuration.
- You can now start using the software and connect USB I/O modules.
Troubleshooting:
If the ID field remains visible, repeat steps 1 and 2.
Subsequent Software Launches:
Once activated, the software will not require reactivation. Simply click the READ CONFIG button, and the software will automatically activate.
Important Notes:
- The provided activation key (ID) is valid for one workstation only. It cannot be cloned or used on additional devices.
- In the event of hardware failure, you are entitled to one additional activation code free of charge. To obtain this, please contact our technical support team with a request.
What are the requirements for PC architecture and OS Windows?
BEEPTOOLKIT is optimized for use on low-cost devices that support the basic architecture of Windows 10 LTSC. Its low disk space requirements (less than 175 MB) and memory usage (less than 30% of 4 GB RAM) make it suitable for both tablets and industrial PCs (IPCs), providing flexibility and democratizing the automation process.
To properly display the user interface, make sure your monitor supports and is configured to a resolution of at least 1920×1080.
Example architecture:
Tablet PC (Minimum Budget):
- Model: Chuwi Hi10 X
- Specifications:
- Processor: Intel Celeron N4120 (4 cores, 1.1 GHz, up to 2.6 GHz).
- RAM: 6 GB.
- Storage: 128 GB SSD.
- Screen: 10.1″, Full HD (1920×1080).
- OS: Windows 10 LTSC.
IPC (Industrial PC) (Minimum Budget):
- Model: Advantech ARK-1124U
- Specifications:
- Processor: Intel Atom E3940 Quad-Core (1.6 GHz).
- RAM: 4 GB DDR4.
- Storage: 64 GB SSD.
- Ports: 4 x USB, 1 x LAN, 1 x RS232/485.
- OS: Windows 10 LTSC.
Can the BEEPTOOLKIT interface be replaced with an HMI (customized for end users or clients)?
Such an option is available through cooperation with Beeptec Engineering. This is an additional paid service.
If your projects involve the integration of custom user panels, including those with Touch Screen functionality, you should submit a request to us. Detailed instructions about these services, including an evaluation questionnaire, will be provided to you.
A commercial offer will be sent within 24 hours of your request.
Hardware - Topics about the Hardware of BEEPTOOLKIT.
How to set the OUTPUT USB GPIO module ID and configure port access?
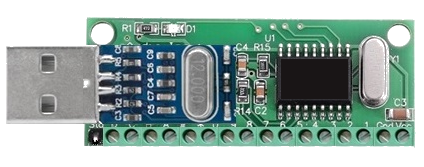
Your actions:
- Install the output USB module into the corresponding USB port on the PC (USB Hub);
- Make sure that Windows recognizes the device as a USB Audio DAC and set the device volume to 50%;
- Launch BEEPTOOLKIT, and in the MANUAL OUT TESTING section, perform a test call to one of the 16 channels. A correctly set ID number will cause the device’s LED to blink red when any button is pressed. In case of incorrect identification, specify a different number through the ID OUT element and make another attempt to access one of the channels, and so on.
How to set the INPUT USB GPIO module ID and configure port access?
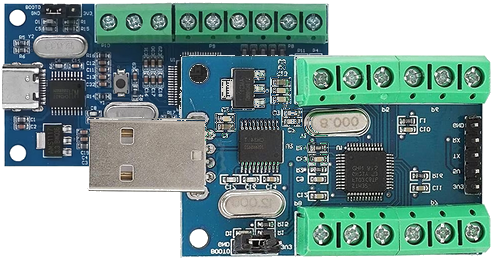
Actions:
Connect the USB input module: Insert the USB input module into the appropriate USB port on your PC (or USB hub).
Launch BEEPTOOLKIT: Open the software, go to the ID IN drop-down menu and select ID COM N (except COM1).
Test the Connection:
- Click the TEST/CLEAR button to run a test.
- If the connection is incorrect, a warning message will appear indicating that the requested device is not detected, and the error will be displayed.
- A correct connection will trigger no events, and the green LED will briefly light up and then turn off.
Perform Data Measurement:
- Select the 10-channel or 16-channel module in the “Sensors” block. Press TEST/CLEAR to start the test measurement. The measured parameters for the selected channels will appear in the SENSORS VOLTAGE section. !Before connecting modules, make sure that all free GPIO pins are connected to the GND pin via 10 kOhm resistors. The read voltage should not exceed 3.3V. Exceeding this voltage can damage the device.
- Click TEST/CLEAR to start the measurement. The measured parameters for the selected channels will appear in the SENSORS VOLTAGE section.
- Ensure that all 16 GPIO pins receive no more than 3.3V (power for screw terminals can be supplied directly from the device’s 3.3V pin). Exceeding this voltage may damage the device.
Clearing the measurement buffer:
- Unselect the channels marked in the INPUTS section and press the TEST/CLEAR button to reset the test measurement buffer.
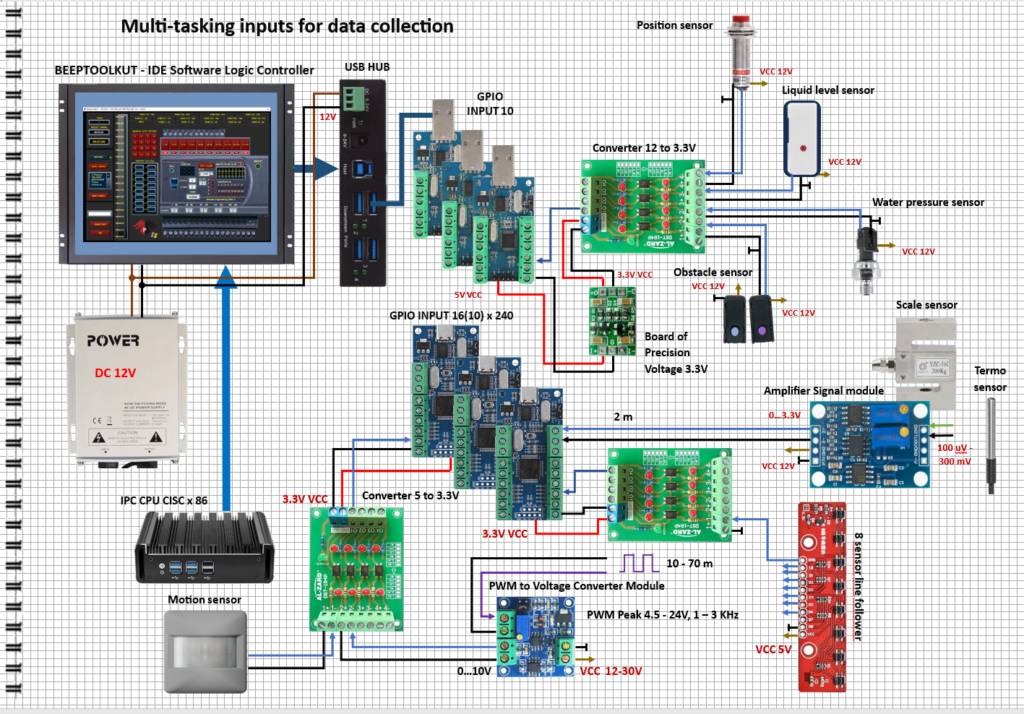
Hardware Ecosystem of BEEPTOOLKIT
A set of hardware components and devices that interact with each other and with the software within the Beeptoolkit – IDE Software Logic Controller platform.


News and Updates - Topics about the News and Updates of BEEPTOOLKIT.
Why is it not possible to download BEEPTOOLKIT - IDE Soft Controller?
Dear Friends!
We are excited to welcome you to the new year 2025 and introduce the updated website of BEPTOOLKIT – IDE Soft Controller!
Your feedback is important to us! We would greatly appreciate it if you could share your impressions, comments, or suggestions about the website’s usability.
Thank you for being with us!
Beeptoolkit 2025 Update - IDE Software Logic Controller, Version 120725
Since July 12, 2025, an updated version (D, S, P) Beeptoolkit – IDE Software Logic Controller V.12072025 is available.
On the main R&D panel, as well as on the instruction input panels for each automaton, a switch has been added to select the type of connected USB input modules:
either 10-channel or 16-channel. By default, all automatons are configured for the 10-channel input module.
Examples of hardware modular design
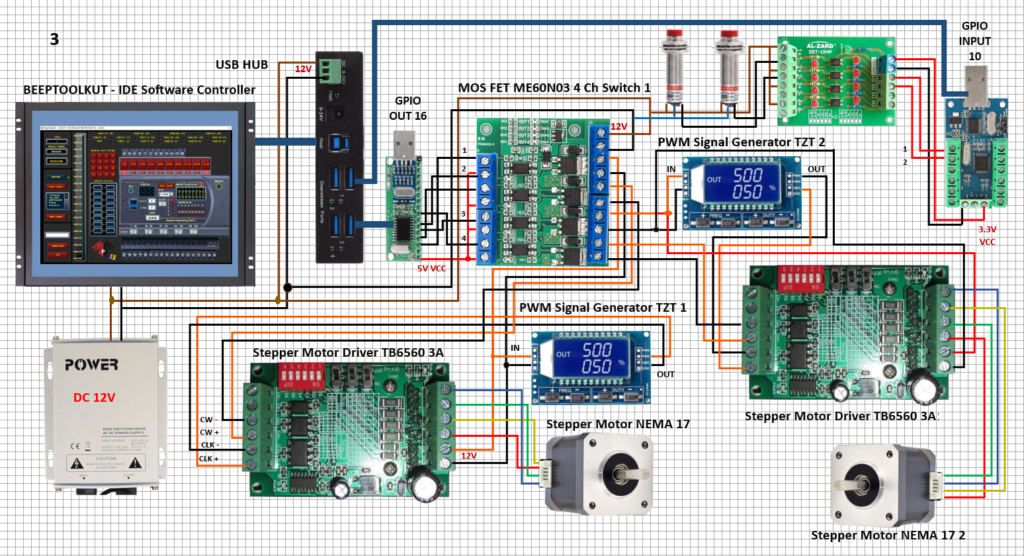
Block diagram of automatic reversible control of two stepper motors using position sensors.
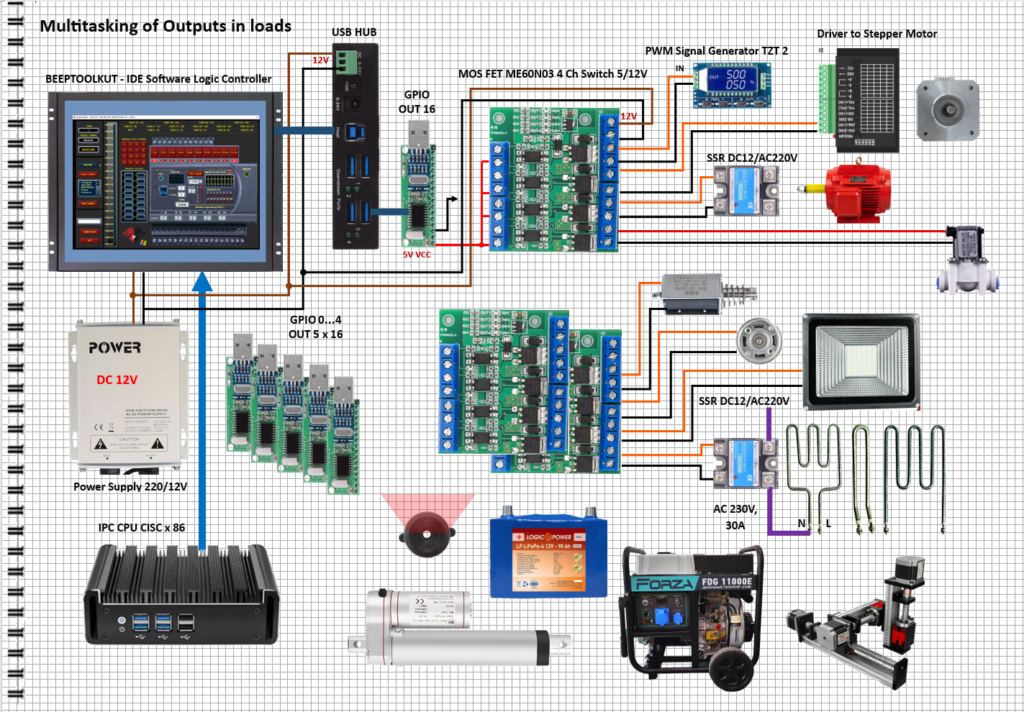
Block diagram for connecting devices to the Output USB GPIO module
Block diagram of device connections to the Input USB GPIO module